Friday, September 28, 2012
Thursday, September 27, 2012
Tuesday, September 25, 2012
DIY Tin Can Pumpkins
Today I am over at Somewhat Simple sharing these little tin can pumpkins.
Stop by and check them out.
Monday, September 24, 2012
Saturday, September 22, 2012
Pregnant with Twins Week 16
Just a few thoughts about being pregnant with twins.
- I am so exhausted all the time
- Taking daily naps is a must
- My pregnant belly is really showing now
- I have to go pee all the time
- Brody is really excited for the babies
- My 1st ultrasound is scheduled
- I am hungry all the time
- I am busy planning and organizing so I will be ready for the babies birth
Friday, September 21, 2012
Vacation
I feel like I am playing catch up from our two and a half weeks of vacation.
The first week and a half was spent at our cabin in Flaming Gorge.
We also spent a week at Newport Beach in California.
We took a day trip to Catalina Island and hung out at the Descanso Beach Club.
We also drove to San Diego to see the Cardinals play at PETCO Park.
PETCO is awesome!
Of course we had to go to Disneyland too.
But we mostly spent our time hanging out at the beach.
Wednesday, September 19, 2012
Monday, September 17, 2012
Ad Sale!
Are you ready for a big ad sale? I am offering a big discounted price for ads during the month of October.
Ad space is limited so email me to reserve your space.
Feel free to pin this, Tweet it or share it. For more information and details email me at dianna@whateverdeedeewants.com
Friday, September 14, 2012
DIY Corner Book Mark
This is probably one of the easiest page saver tutorials you will find!
All you need to make this corner book mark is
An old envelope or flat paper bag (the kind card shops use)
Scissors
Tape or glue
Decorative paper
Scalloped scissors
Ruler
Pencil.
Scissors
Tape or glue
Decorative paper
Scalloped scissors
Ruler
Pencil.
Start in the bottom corner of the envelope or flat paper bag.
Measure in about two inches (or desired size) on both sides and make a small mark.
Using your ruler connect the two marks to make a straight line as shown below.
Cut along the line.
You should now have the most basic corner bookmark.
From there you can write a message on the bookmark or cover with decorative paper by simply cutting a coordinating sized triangle and gluing it on the bookmark.
For a scalloped edge, simply cut along the bottom with scalloped scissors.
Easy!
Thursday, September 13, 2012
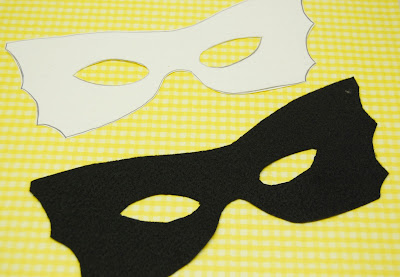
DIY Felt Mask
This little mask took about 10 minutes to make. It is really easy.
The mask can be as basic or elaborate as you want.
You will need:
Mask template
Felt
Ribbon or elastic
Needle and thread
Scissors
Straight pins
First download and cut out your mask template.
Place the template on desired felt and pin in place.
cut.
This mask that I am showing is the simplest design.
If you want you can add any embellishments you want at this point.
I like to use two colors of felt and layer them.
You can either use elastic or ribbon for this next part.
Cut ribbon or elastic to desired length.
Measure in about a half an each near the corner of the eye (as shown below).
Sew one side of the ribbon or elastic.
Repeat on the other side.
And now your mask is complete.
Wednesday, September 12, 2012
DIY Calendar Blocks
I had fun making these calendar (or countdown) blocks. I'm sure you will too.
Start by cutting 2 x 2 inch blocks.
You can do any size you want, just make sure they are the same measurement around.
Sand the blocks.
Make sure they are super smooth.
Paint the blocks.
I like to use acrylic paint. It's cheap, easy, drys fast and is easy to clean up.
Allow the blocks to dry thoroughly.
Chose some pretty paper and cut into squares just smaller than the blocks.
Lightly coat one side of the block with Mod Podge.
Place one paper square on top of Mod Podge.
Smooth the paper down, making sure there are no bubbles.
Let dry.
Continue until each side of both blocks are covered in paper.
Paint a light coat of Mod Podge on the block.
Apply your first number.
Make sure to press firmly, making sure there are no bubbles.
Let dry.
Continue on each side until both blocks are numbered.
Use the numbers in the following order
Block 1- 0,1,2,3,4,5
Block 2- 0,1,2,6,7,8 (the 6 doubles as the 9)
Lightly coat each block with a final layer of Mod Podge to seal it.
Let dry.
Now you can either use your blocks as a calendar or as a count down calendar.
Enjoy!
Send me pictures of your calendar blocks, I would love to see them!
Tuesday, September 11, 2012
My Guide To Disneyland
Today I am spending the day at Disneyland!
Here is my must see/must do/must eat, etc... guide to Disneyland.
Main Street
- Eat potato cheese soup at Carnation Cafe
- Buy yummy treats {rocky road, taffy, etc...} at the Candy Palace
- Get a silhouette made
- Have breakfast with Minnie and friends at the Plaza Inn
- Get a locker
- Get fast passes for Indiana Jones ride {I like to sit in the very back or the very front}
- Grab a skewer or two at Bengal Barbecue
- Get fast passes for Splash Mountain {if you don't want to get soaked, ride in the back}
- Stop by Pooh Corner for yummy treats { snicker doodles and sugar cookies}
- Get fast passes for Space Mountain
- Take a trip to the 1970's and ride Star Tours
- If your hot go see Captain EO. Great way to rest your feet and cool down
- Eat a hot churro
- Kill aliens on the Buzz Light Year ride
- Walk through Sleeping Beauty's castle
- Ride Matterhorn bobsleds
- Ride Small World to cool down and rest your feet
- Ride the tea cups over and over again
- Get your own Mickey ears made at the Mad Hatter Shop
- Try to pull the sword out of the stone
- Ride Thunder Mountain Rail Road {hold on to your hats and glasses, this here is the wildest ride in the wilderness}
- If you like Mexican food stop by Rancho del Zocalo Restaurante
- Ride Pirates of the Caribbean
- Go in the Haunted Mansion
- enjoy a refreshing {virgin}mint julep
- Ride Roger Rabbits' cartoon spin {gotta love Jessica Rabbit}
- Ride Gadgets go coaster
- Pose in front of all the silly Toontown houses
Don't forget to check out my California Adventure list here.
Monday, September 10, 2012
DIY Headband
 Ready to make a fun and easy headband?
 You will need:
One piece of 32 x 2 1/4 inch fabric.
One piece of 19 1/2 x 1 1/4 inch fabric.
Small felt circles.

You may want to trim the ends of your strips of fabric. This will make them a little narrow to make it easier to tie but you don't have to. I trimmed mine down to 1 inch on the ends.
It's ok if it frays or is uneven as that is part of the look.
Sew around the edge of the large strip.

Center the small strip on the large strip of fabric and pin.
 Sew around the edges.
 Your basic headband is complete and should look like this.
 This is where you can be a little more creative. You can add any type of embellishment on the headband here. We chose to make little ruffles.
 To make the ruffles take one felt circle and fold it in half.
And fold that in half again.

I like to put a few stitches in the bottom of the folded circle to help secure it, otherwise you can sew it directly on to your headband.
Sew as many folded circles on your headband as desired.


Subscribe to:
Posts (Atom)


