Showing posts with label Give Thanks Event 2011. Show all posts

Monday, November 21, 2011

Give Thanks: Thanksgiving Table Settings

Keersten from Leap Into Art

Hi there! I am Keersten from Leap Into Art. I am an art teacher
and mommy to 3 crazy little girls. (Yes, we are swimming in pink at our house!) I share art projects to do with your kids and sometimes by yourself, along with our girlie adventures and some of my favorite recipes.

I think the holidays are a time when we are all feeling a little lean (at least in the wallet--I can only hope for the skinny jeans!) So, here are 3 ways to trim your table without shelling out much green. First of all, take a look around at what you have in your cupboards and start imagining a way to work with what you've already got. Serving trays and bowls are great, baskets and even cups and mugs can make a great foundation for a fun centerpiece. Here are a few tips to keep in mind:
  • Keep it simple-the food and the company should be the stars of this
    meal, your awesome table is the whipped cream on your pie.
  • Let the conversation flow-tall centerpieces make it hard for people
    to see each other and lively debate is what will make the dinner fun.
    Keep it under 12", but lower than that is certainly better.
  • Make it yours-don't be a slave to tradition or seasonal stereotypes.
    If you don't want pumpkins or fall leaves, then leave them off the
    table, these ideas will certainly translate to other objects. If you've
    always wanted your own cornucopia, then by all means, go for it!
  • Keep it in proportion-don't forget to leave room on the table for
    the meal.
  • Lessen the stress-I'd like to embroider this on a pillow and have
    someone repeatedly hit me with it during the prep for big events like
    Thanksgiving. It doesn't have to be perfect. No one expects it to be and
    only you will notice that it isn't the magazine picture that you see in
    your head. Your friends and family are there to be together. The meal
    you are working so hard on will be eaten and gone, the table will be
    cleared away; but what will last is the memory. So take a deep breath,
    laugh at the things that go wrong and try to enjoy yourself (because
    isn't that more fun for everyone anyway?) Okay, now the ideas:

refresh the traditional:


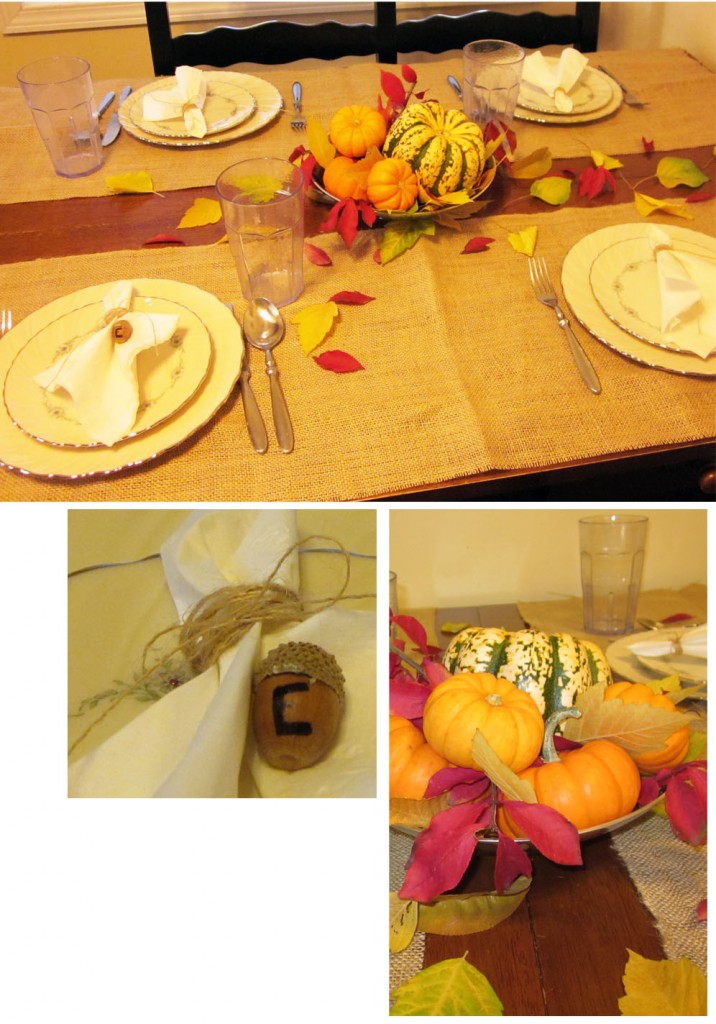
You can't go wrong keeping it classic. One of the best things about using a traditional scheme is how easy and inexpensive it can be to create something fun. Once you have found possible containers, head to the produce section and grab a few mini pumpkins and gourds. Take a nature walk with a grocery sack to get the rest of your frills. Autumn leaves, branches with berries, nuts and acorns can be found all over and will come together to give you the perfect palate to set off that big bird on the platter.

I love to break away from the expected table cloth; it's a great way to give instant interest. Cut a length of burlap in half or thirds to make a couple of table runners. (Thin enough to leave a strip of the table surface showing in the center.) You can pull a few threads out to fringe the edges. Line them with the outside edges of the table to make essentially a table long place mat. Then set out your bowl or basket and arrange the gourds inside, now fill it in with leaves.

You can tie napkins with some twine and lay them on the plates with an acorn "place card." (Just use a Sharpie with a good point to write the initial or first name of your guests on an acorn.)

get crafty:


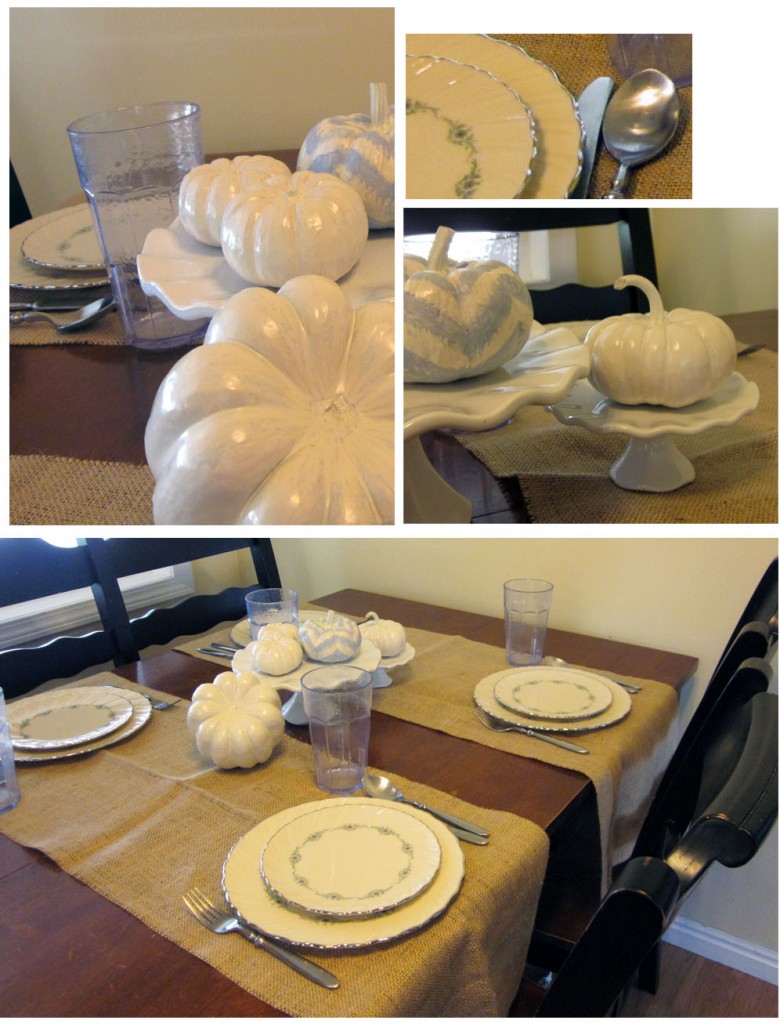
After you have picked up some pumpkins and found something to display them on; you can get to work setting your own personal style on the table. Here I have spray painted the gourds with ivory then added chevrons to one of the pumpkins. To give it a distressed look, I used acrylic craft paint and kept the brush dry, adding only a little paint to the brush at a time. To make the chevrons, simply slant a line diagonally across each section of the pumpkin, up then down, up then down, etc. This technique would also work well with other colors of paint. You could do a variety of colored strips and polka dots to create a whimsical kid-inspired table.

I cut burlap into long strips and laid them across the table for each place setting. This looks great in several fabrics and is a unique way to create something more interesting (and less expensive-yay!) than a place mat. You could also lay wide strips of ribbon running both ways on the table to give it flare.

go glam:


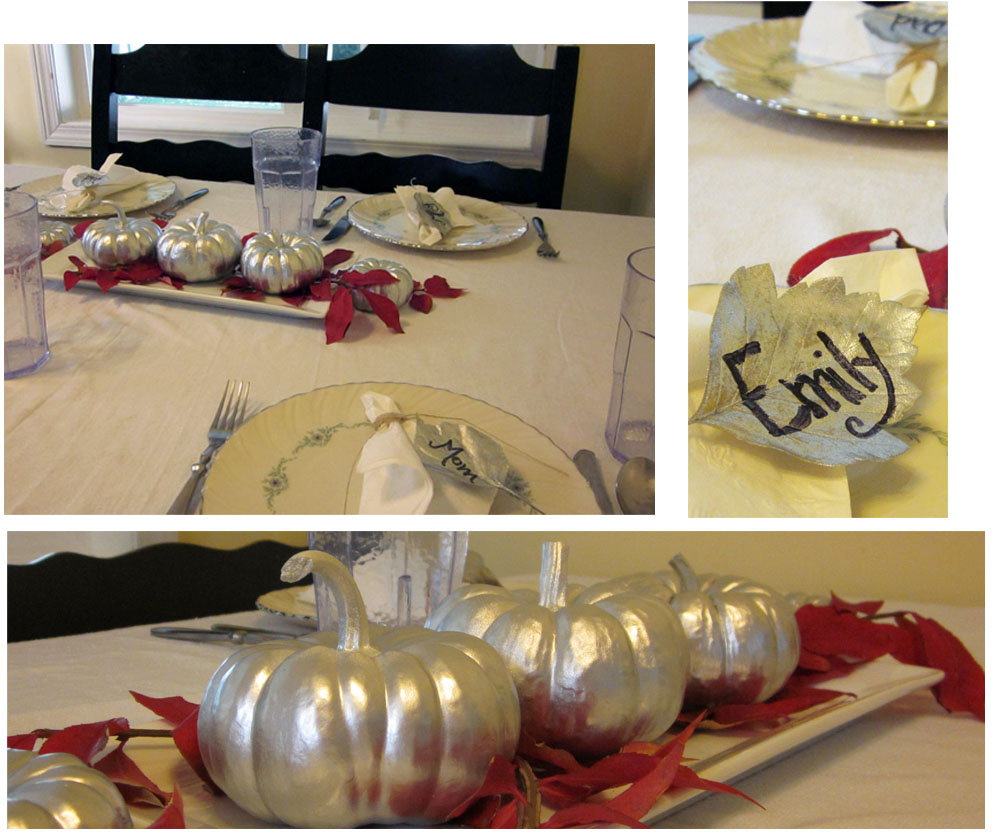
Following the same technique as above, spray the pumpkins with a couple of layers of metallic spray paint. Keep the overall arrangement fairly simple, adding one or two colors of fall leaves or nestling the pumpkins in with votive candles. This arrangement will definitely be memorable!
You could also add some glitter if you like to take it over the top.
Spray leaves with the same shade of spray paint and write your guest's names with a sharpie to create a fun place card. It is best to use leaves that are still supple for this and do it no more than a few days
before the feast so they don't crumble when handled. Whatever you choose to do, enjoy! That is what the day is all about.

Sunday, November 20, 2011

Give Thanks: Thanksgiving Toppers

Lauralee from Yellow Mums

Hi there!
I'm Lauralee.
I blog over at  YellowMums and I'm excited to be part of this awesome Give Thanks event!


Today I'm sharing some fun Thanksgiving Toppers. Click here to download the free printable. Great as cupcake toppers. . . but also great for lots of other things. Here are a few ideas to get you started.

1. Dress up a canning jar with a LABEL for jams/jellies or a mini pie perhaps?


2. Make a CENTERPIECE. I did this one by taping the toppers to skewers and poking them into the top of a pumpkin. Then I stuck a bunch of  . . . rye grass maybe? (I found it in the weeds over by the dumpster on the corner ;) Poke holes with a skewer and stick them in and finish with a jute bow at the base.


3. Create a NAPKIN RING with a piece of string and a topper hole punched. Add some sort of plant filler to round it out--maybe use something fake (not like me ;)


4. Use as a TAG for favor bags, gifts, or presents.


enjoy!! And have a wonderful Thanksgiving!!

Saturday, November 19, 2011

Give Thanks- Pumpkin Sugar Cookies


Hello there lovely readers of Whatever Dee-Dee Wants!  I’m Kelly from Eat Yourself Skinny and I was so excited when Miss Dianna asked me to be a part of her Give Thanks Series!

Ok so I must tell you…I absolutely love Thanksgiving.  It’s a time to spend with friends and loved ones, a time to bundle up in cute scarves and boots and take pictures in the leaves, and a time to enjoy really, really delicious food!  Yeah you know what I mean, the usual turkey, stuffing, cranberry sauce, Grandma’s signature green bean casserole, etc.  But what about the fun desserts??


Friends I give you my delicious {lightened up version} of Pumpkin Sugar Cookies!  I had so much fun making these and was really surprised at how simple they were.  To make them “skinnier”, I used egg whites and substituted the sugar with Splenda Sugar Blend which lowered the calories tremendously.  Since there is already a lot of sugar used to make the icing, Splenda works perfect for your cookies!  Oh and speaking of icing…if you’ve ever heard of piping and flooding Royal Icing then you know how gorgeous cookies turn out when using that method.  And you also know how daunting the task can be if you’ve never tried it.  Yikes.

I’ll admit this was my very first attempt at making {and using} Royal Icing, but truth be told I LOVED it!!  I, of course, went to the Queen of cookie decorating herself, Bridget from Bake at 350, for help and found some amazing tutorials!  This made the process so much easier and I’m happy to share that knowledge now with all of you.

The end result?


Super cute pumpkin cookies fit for any special gathering or holiday party.  They also make great gifts!  I brought mine to work for all my co-workers and everyone loved them.


Now onto the recipe.

Here are your ingredients:
Recipe adapted from Cooking Light and Sugar Crafter   

Cookies

2 1/2 cups all-purpose flour
1/2 tsp. baking powder
1/4 tsp. salt
1 cup granulated sugar
10 Tbsp. light butter, softened
1 1/2 tsp. vanilla extract
2 large egg whites

Royal Icing

1 lb. powdered sugar
5 Tbsp. meringue powder
Scant 1/2 cup water
1 tsp. corn syrup (makes the icing shiny)

To make the cookies, lightly spoon flour into dry measuring cups and level with a knife.  Combine flour, baking powder, and salt, stirring well with a whisk.  Place granulated sugar and butter in a large bowl; beat with a mixer at medium speed until light and fluffy.  Beat in 1 1/2 tsp. of vanilla and egg whites.  Gradually add flour mixture to butter mixture, beating at low speed just until combined.  Divide dough in half and shape each dough half into a ball and wrap in plastic wrap.  Chill for about an hour.

Preheat oven to 375 degrees F.  Unwrap one dough ball and press dough into a 4-inch circle on heavy-duty plastic wrap.  Cover with additional plastic wrap.  Roll dough, still covered, to a 1/4 inch thickness {this is important because if your cookies are too thin they’ll be crunchy and not soft}.  Using your cookie cutter, cut dough into 18 cookies.  Place cookies 2 inches apart on baking sheets lined with parchment paper.  Bake at 375 for 10 minutes or until lightly browned.  Cool on pans for about 5 minutes and repeat the process with the remaining dough half.


To prepare the icing, please refer to Bridget’s wonderful tutorial on how to make Royal Icing and tips for decorating.  I can’t take the credit for her wonderful work!  Once your cookies are dry, mix a bit of meringue powder and water together and, using a paint brush, paint lines onto your pumpkin with the mixture and sprinkle with sprinkles.  You will be amazed at how easy the sprinkles stay on!  This technique is perfect for any cookie!

Don’t forget to buy cute little gift bags and ribbon to package these for your friends and family, trust me they will love them!

Thanks again Dianna for inviting me to your Give Thanks Series!  For more skinny recipes, or even just to say “HI”, feel free to stop by my blog any ‘ole time!

XOXO

Friday, November 18, 2011

Give Thanks- Thankful Cards

Mollie from Wild Olive


Hello, Readers of Whatever Dee Dee wants {she's gonna get it}!
This is Mollie from Wild Olive. I love making things, cuteness, Jesus, and this time of year, Thanksgiving. It's pretty much my all time favorite holiday.

When families gather together, they often share a tradition of going
around the table and telling what they are thankful for. It's funny,
but I don't remember ever doing that on Thanksgiving at my house.
Instead, we talk about this on a regular basis...all year 'round. But
whether you think about thankfulness one time a year, or every single
day, why not write those things down to remember always?


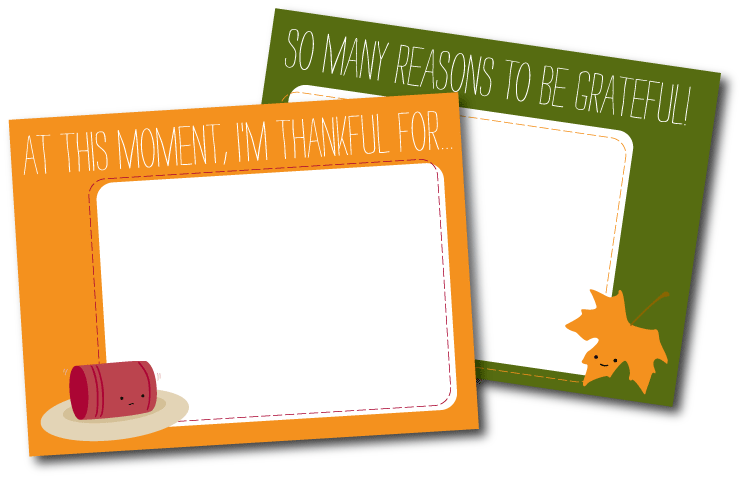
These printable cards each have a thankful phrase to get you and your
family or friends started thinking about what you're most grateful
for. Print a bunch and set one at every place setting, or keep them
around to jot down your daily moments of thanksgiving!

Download
the printable PDF file here.


Thanks, Dee Dee for having me, and I hope everyone has a wonderful Thanksgiving!

Thursday, November 17, 2011

Give Thanks: Three Day Coconut Cake


Shannon from Dinner or Dessert


Hi, I'm Shannon from Dinner or Dessert and am so excited to be guest posting for Dee Dee as a part of the Give Thanks blog event! 

I look forward to Thanksgiving every year. I have to admit one of the reasons is because it means I can listen to Christmas music without people thinking I'm crazy. But really it's because I get to see my family and remind them how much I love them! Oh and the good food is always an added bonus. 

Every Thanksgiving my family meets at my grandparents house in Nashville, TN to eat our hearts out. But with every holiday dinner comes a lot of work. My grandma starts planning the menu months in advance and then there's the grocery shopping, preparing the food and making sure it all comes out hot at the same time. When you only have one oven, it seems like there is never enough time or space to get it all done in time. Well this coconut cake gives you one less course to stress about because you make it three days ahead of time. It is the best coconut cake I've ever had and is a perfect Thanksgiving dessert because it needs to sit in the fridge for three days before serving! It is a four layer white cake, layered with a sweet coconut mixture that seeps into the cake, topped with coconut cool whip frosting and flaked coconut. It is so flavorful and oozes with coconut flavor without being one bit soggy. Try it, you will love it! 

Three-Day Coconut Cake

1 box of white cake mix 
16 oz. sour cream
12 oz. frozen coconut, thawed (in the frozen fruit aisle)
2 c. sugar
1 8 oz. container of cool whip
1 bag of flaked coconut 

for the cake:
Preheat the oven to 350°F. 

Prepare cake mix according to the box and spread between two 9-inch round cake pans. Bake according to the box. Once the cakes have cooled, split each 9- inch round to make a total of 4 layers. 

for the coconut mixture:
While the cake is baking, blend together the sugar, thawed coconut and sour cream and chill for at least 20 minutes. Set one cup of this mixture aside to mix with the frosting. Layer about 1 1/2 cups of the mixture between each cake layer. 

for the frosting:
Blend together 2 cups of cool whip and the 1 c. of coconut mixture you set aside. Frost the cake and then sprinkle the top and sides of the cake with coconut flakes. 

Cover and refrigerate cake for 3 days.

Wednesday, November 16, 2011

Give Thanks: Leaf Garland

Allison from Little Lovelies

My name is Allison and I blog at little lovelies.


I am so happy that I was invited to be a part of this Give Thanks event!


I am a wife and full time working mom, and I love to create in my spare time. It's my "me" time and it brings me a bit of peace in my otherwise hectic life. I have been blogging for less than a year, but creating things for as long as I can remember. Isn't that the story with most of us crafty folk? Here are a few of my favorite projects you can find on my blog:

1, 2, 3, 4

On to what you are all here for - a project.

We are planning on having Thanksgiving at my house this year, so I wanted to make something to add a bit to the decor.


It is such a simple project, but I love the pop of color it gives to our front sun room.

I started with a sale $5 wired garland from Hobby Lobby. I didn't really like the wires, and it was only six feet long, so I had to make it work (said in my best Tim Gunn voice). I just cut the individual leaves off.


After cutting off the leaves, I sewed them together in a long line, overlapping the leaves about one inch.


I used a light yellow thread that really stood out against the red leaves. It wasn't a huge deal, but I can't leave well enough alone, so I used a brown marker to "color" the thread so it really blends in. You can skip this part, but I wanted the thread to be more hidden.


We have these hanging on our porch and over our curtain rods around the house. I love bringing the look of the outdoors in, and I love the festive feel it adds to our home.

Thank you so much for having me! Happy Thanksgiving!

I would love for all of you to come visit little lovelies, say hi, and browse around. You can also find me on facebook and pinterest - I'd love to get to know you better!

Photobucket

Tuesday, November 15, 2011

Give Thanks: Pumpkin Cake


Elizabeth from Simple Simon & Company

Hi.  I am Elizabeth from Simple Simon and Company, where I blog with my sister-in-law who shares the same name.  We both blog about crafting and sewing, especially vintage anything....but we love to add modern twists to make it new again!
I know that anyone who knows us is expecting some great sewing project....but I just can't let this season of Thanksgiving pass without sharing the BEST {and easiest} Pumpkin Cake recipe that I have ever found.
It really is the most pumpkinny (ok...I know it's not a word), moist and best cake ever.  I crave it.  A lot, especially this time of year.
And now I am sharing this easy, and fast recipe with you today.

Grandma Lova's Pumpkin Cake Recipe
1 yellow cake mix {see I told you it was easy}
1/2 cup of water
1 egg
2 cups of canned pumpkin
1 teaspoon baking soda
1/2 teaspoon nutmeg
2 teaspoons cinnamon
Mix all of the ingredients with your mixer until smooth.  Pour into a greased 9 x 13 pan and bake at 350 degrees for 25 -30 minutes....until a toothpick comes out clean.
Frosting
1 can vanilla frosting
1 oz brick of cream cheese softened
Mix frosting, and frost cooled cake {if you can wait that long}.  Serve immediately.  Refridgerate leftovers.
Ok, I know that some of you are thinking that with a box cake mix and canned frosting that it can't be that good...but I PROMISE you that it is.  You will be dreaming about this cake.
{And I may or may not have been eating this cake for breakfast almost every day this week.  It's even better the next day out of the fridge.  Just sayin'}
Simple Simon & Co
Thanks for having us.....I am excited to see all of the other "Give Thanks" events going on {and will probably be pinning most of them}!

Monday, November 14, 2011

Give Thanks: Fall Fashion

Jackie from Sweetie Pie Style

It's already that time of year to start shopping for family holiday outfits!  Be it for family photos for your Christmas cards, Thanksgiving dinner or a holiday party, there are plenty of events where you will want your family to look coordinated and polished.  For some inspiration, I have created looks for a family of four: mom, dad, brother and sister.  I like to go with a unified color scheme, so here I have chosen shades of gray and purple.


Mom:


Dad:


Girl:

Boy:


I hope that gives you some ideas for your family!  Come visit me at my blog Sweetie Pie Style for daily posts on fashion, interiors and lifestyle!  Thank you Dianna for having me participate in your Give Thanks series!

Give Thanks Giveaway: Garnish

I am excited to tell you about today's giveaway! Today's giveaway is from Garnish, one of my favorite shops! I am always in awe of their ideas. Whether it's a clever table setting, a pretty package, the details for a party or a boxed lunch, I love it! Garnish is all about adding the special details to pretty much everything, and who doesn't love that?

Now through December 23rd Garnish is offering $6 flat shipping on all new orders in the USA. 
 Garnish even has a blog where they share their fun ideas. 
Below are some of my favorite Garnish ideas.


One lucky Whatever DeeDee Wants reader 
will win $25 to Garnish!
This giveaway is closed.
The winner is Natalie Wahl!


To enter fill out the form below

Bonus entries
Follow this blog on Google Friend Connect
Like me on Facebook
Like me on Twitter


Giveaway ends at midnight on Saturday, November 19th
Winner will be notified by email
Winner will be chosen by Random.org