Showing posts with label Give Thanks 2012. Show all posts

Monday, November 19, 2012

Give Thanks: Harvest Fruit Salad


One of the hardest things about Thanksgiving dinner is deciding what sides to make. I mean we all know the main players. That is a no brainer.

Turkey-Check.
Potatoes-Check.
Gravy-Check.
Rolls-Check.
Pie-Check.

But alas, what to do with the other sides. There are so many to choose from. How does one narrow down what to make?

Well I am gonna help you at least narrow down one. The Salad. Salad is nice to have on the Thanksgiving table. There is veggie salad, jello salad, and fruit salad.

Today I am sharing a totally simple and quite delicious fruit salad.

This Harvest Fruit Salad is a great addition to Thanksgiving dinner.

Harvest Fruit Salad

6 cups diced apples
2 cups halved red grapes
1 pomegranate, seeds only
1 cup walnut pieces
1 1/2 cups sugar
1/2 cup flour
1 1/2 water
1 Tablespoon butter
1 teaspoon water

First prepare all the fruit.


Aren't pomegranate seeds gloriously lovely??


Place all of the fruit into a large bowl.

Now make the sauce.

Combine the sugar, flour, and water in a saucepan. Heat over medium high heat until it boil lightly and starts to thicken. When it thickens, remove from heat and stir in butter and vanilla.


Let it cool for about 5 minutes. Then pour it over the fruit and evenly coat.


Then stir in the walnuts.


With everything all mixed and pretty all you need to do is serve it up.


Now that will make your mouth happy and your Thanksgiving dinner complete.

Thanks for having me! Come over to Just Another Day in Paradise, say hi and look around!

Thursday, November 15, 2012

Give Thanks: Gratitude Table Runner


Good morning, Whatever Dee Dee Wants readers!  I’m Sabra from Sew a Straight Line.  I love this time of year.  Thanksgiving is one of my favorite holidays and I’m in full support of giving it the recognition it deserves.  I really love the idea of a holiday completely focused on gratitude and acknowledging all the good the past year has brought into your life.  For me, that’s what Thanksgiving is all about.  Also, turkey.  But mostly, giving thanks.

For my Give Thanks contribution I’ve made what I’m calling
IMG_9907

It’s just a super simple, basic table runner with empty “windows” of fabric that run its length.
IMG_9906

My plan is to have my kids fill in those windows over the course of the month leading up to Thanksgiving.  I’ve encouraged them to come up with things they’re grateful for, and use fabric markers and crayons to illustrate and document those blessings in their lives. 
IMG_9905
My hope is that this simple table runner will become a cherished holiday decoration in our house, and a current reminder of all we have to be grateful for in our family.

My runner was made with eight “windows”, which consist of a 7” square of muslin framed by 2” strips of sashing.

IMG_9889
Then I sewed the windows together with .5” strips of another fabric in between
IMG_9892And then added a 4” border of the same fabric along the sides and end
IMG_9895
And then finished everything off with some simple binding and free-form machine quilting.  For extra practicality, I used insulated batting (like you would for hot pads and oven mitts), so that we can put hot dishes directly on the runner, if needed. 

IMG_9898
Then I’ve just provided the fabric markers and crayons for my kids to use, directing them to color in the windows

IMG_9899
So far, the kids have loved it and it’s been a fun project.

IMG_9900
I’m excited to watch the windows fill up with my kids’ expressions of gratitude and thanksgiving.  And hopefully it will serve as a warm reminder of all we have and all we love.

IMG_9909

Wednesday, November 14, 2012

Give Thanks: Printables and Pumpkin Loaf


Thanksgiving Printables & Pumpkin Loaf
by Jordan Bariesheff from Polkadot Prints - www.polkadotprints.com.au

Since arriving in Canada, I really understand the seasons more and realize that some foods just aren't in season when I'm use to having most produce year round.

A new friend here gave me this pumpkin bread recipe when pumpkins finally came into season. I've made it a number of times already and people are now asking me for the recipe. So now I pass it on to you. It's moist and delicious, and I know you'll like it!

Pumpkin Loaf

3 c. white sugar
1 c. cooking oil
4 eggs
1 can (15 ounce) of pumpkin puree
1 1/2 tsp. salt
2 tsp. cinnamon
1 tsp.nutmeg
2 tsp. baking soda
2/3 c. water
3 1/2 c. flour

Mix in order of ingredients in large bowl. At end, alternate flour and water a bit at a time to get good consistency. Grease 2 loaf pans. Pour batter into pans. Bake at 350 degrees for 53 - 55 minutes (depending on your oven just check it).
Serving this loaf at your Thanksgiving dinner, or packaging it up for your guests to take home, will add some warmth & welcome to your Thanksgiving table.
You'll find a free printable including a belly band as well as a swing tag below, to create a classic black & Kraft tablescape. Or why not mix it with khaki green or a crisp white for a different look!
Here's what you'll need:
String
Kraft Glassine Bags
Greenery - real is best, or fake from a craft store

You can use the swing tags for your apple cider jug or use for take home favors or leftovers containers…whatever you like really!
We can never be thankful enough for all that we have. I hope you have a wonderful Thanksgiving!

Monday, November 12, 2012

Give Thanks: DIY Monogram Pie Seating Chart


 Sara from Confetti Sunshine

I love seating cards. They are such a great way to add a personal touch to any event or holiday. So, for this DIY, I put together two of my favorites - pie and seating cards. You can easily put these pies together with the help of children, family or friends for your Thanksgiving celebration!


All you will need is:
Pot pie tins
Pie crust
Pie filling of your choice


Put together your miniature pie. Instead of putting on the top crust, cut a monogram letter out of the pie crust with the alphabet cookie cutters. Put the letter on the top of your pie and bake according to directions.

Use the pies as part of your Thanksgiving decorations at each place-setting! These little pies look gorgeous, and your guests will have a hard time waiting for dessert!

Thursday, November 8, 2012

Give Thanks: Thanksgiving Style


Hello lovelies! It's Kristin from BonBon Rose Girls. I'm so excited to be visiting Whatever Dee Dee Wants to share my Thanksgiving style with you today! So, do you like to be uber comfy on Turkey Day or do you take a more formal approach and get all decked out? I fall somewhere in between. As the mama of a wild child four year old and a wiggly four month old, I need to be comfortable as I run around after the kiddos, but Thanksgiving is one of my favorite holidays, so I try to look my best too!
Thanksgiving Comfort Outfit Details: here
This look is typical of something I would rock on Thanksgiving. The oversized sweater, skinnies and flats are mama appropriate, but still fun! Adding in some statement earrings and bold red polish takes it up a notch! So, that's the kind of style my fam can expect to see out of me this year. I would love to hear what kind of outfits you'll be wearing this Thanksgiving!

Wednesday, November 7, 2012

Give Thanks: Apple Pie Baked in Apples


Hi Whatever Dee-Dee Wants readers! I'm Vanessa from See Vanessa Craft, where I post about my love for glitter and hot glue guns (among other things). I'm excited to be guest posting here today and I'd love for you to stop by my blog and say hello! In November I will be posting something I'm grateful for every day leading up to Thanksgiving and I'll have a linky up so you can link up your own 22 Grateful Days.

Are you in charge of making the dessert for Thanksgiving dinner? Impress your family and friends with these mini apple pies, baked right inside the apples themselves! This looks much more complicated to make than it actually is. The most difficult part is making sure you don’t cut into the skin of the apple when you are hallowing out the insides. Try using a small melon baller and you shouldn’t have any problems. If your insides look like mush after the hallowing, peel and slice 2 additional apples for a prettier pie filling.  

Materials (makes 4 apple pies, recipe adapted from www.domesticdilettante.com) 4 Large Granny Smith Apples (make sure they can stand on their own) ¼ Cup Sugar 1 Tablespoon Brown Sugar 1 Teaspoon Cinnamon ½ Teaspoon Nutmeg Pie Crust    

Instructions Step 1: Preheat oven to 375 degrees. Use a melon baller or spoon to hallow out 4 apples. Step 2: Slice the insides of the hallowed out apples and mix with sugar, brown sugar, cinnamon and nutmeg. Step 3: Fill the hallowed apples with the apple pie filling mixture. Step 4: Roll out pie crust and slice into thin strips, approximately ¼ inches wide. Place on top of apples in a lattice pattern. Step 5: Place apples in a deep baking dish, fill the bottom with water. Place foil over the dish and bake at 375 degrees for 20-25 minutes.

Brought to you by:
See Vanessa Craft

Monday, November 5, 2012

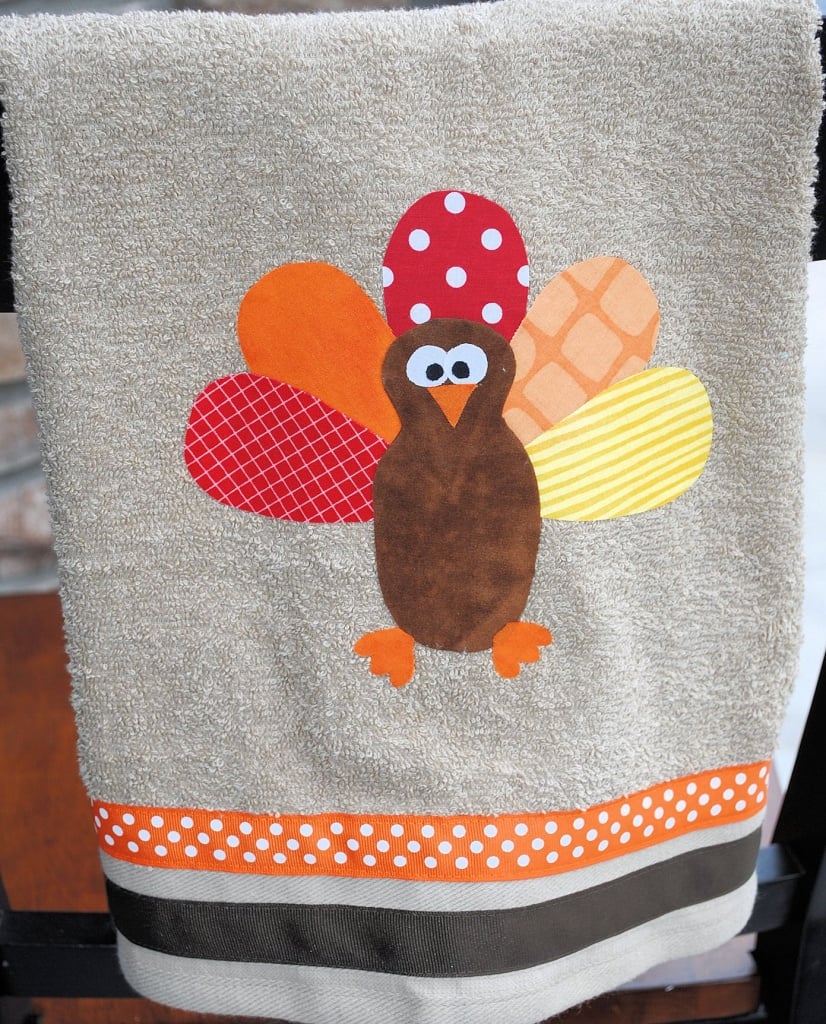
Give Thanks: Turkey Hand Towel Tutorial


Hello Whatever Dee Dee Wants readers! I am happy to be part of the Give Thanks Series! I am Amber from Crazy Little Projects. Please stop by and say hello! Also, find me on Facebook, Twitter, Pinterest or RSS.


My Halloween hand towels turned out so cute and fun I decided to give Thanksgiving Turkey hand towels a go. I think I like these ones even better! They will be perfect as a dish towel or hand towel to decorate my home during the month of November. What do you think? Plus, these ones are no sew-easier to make! Want to make your own?  

What You Need:

Hand Towels or Dish Towels (mine came in a 2 pack at Target for like $3 or $4) Scraps of fabric in Fall colors-red, yellow, orange, brown Heat 'n' Bond Ribbon (optional)  

Turkey Hand Towel Tutorial:


First print and cut out the pattern pieces. Next, using the pattern pieces, cut out your fabric. You will need 1 body and about 5 feathers (you can certainly do more or less, that's up to you). Also, 2 feet, 2 eyes and 2 eyeballs and a beak. Now, cut out the same things but in the Heat 'n' Bond this time. With your iron, adhere the fabric pieces to the Heat 'n' Bond pieces. Peel off the paper backing. Place your feathers where you want them on your towel and iron them in place. Then place the body where you want it and iron it in place. Same thing with the eyes and beak and feet. Make sure everything is adhered very well. Optional: If you want you can add decorative ribbon to the bottom. I sewed that in place. Pretty cute? Don't forget to come say hello to me! at Crazy Little Projects or on Facebook, Twitter, Pinterest or RSS.

Friday, November 2, 2012

Give Thanks: Apple Caramel Tart


Apple Caramel Tart by Hani Bacova from Haniela's

My name is Hani and I love to bake. I'm really  excited to be part of Dianna's Give Thanks series. Thank you Dianna for letting me be apart of this amazing project. "Give Thanks" made me really think what I'm thankful for. Not to make this post thoughts heavy, but I'm thankful for my parents. For their love, support and courage to embrace new unexpected challenges life throws at them.

Today I will share with you a yummy recipe for Apple Caramel Tart.
Apples are  my favorite fruit. They pair up nicely pretty much with everything, in savory dishes as well in desserts, cakes, cookies, cupcakes. 

 If you like to follow my baking and cooking adventures you can  follow me on my blog Haniela's or get my updates in your inbox via RSS, simply sign up here.


Apple Caramel Tart (make one 9 inch tart)                  

Crust
1 stick butter, room temperature, cut into cubes
1/3 cup granulated sugar
1 egg 
1 1/2 cup flour
1/4 tsp ground ginger
2tbl corn starch
1tsp lemon zest
pinch of salt
Preheat oven to 350F
Spray 9 inch tart pan, with removable bottom, with a non stick spray.
In a bowl, stir together, flour, sugar, corn starch, ginger and salt. Add lemon zest and stir.
Add butter and one egg . Using your a fork, press butter and egg around into the flour. Once flour mixture is moisten. Using your hands gather dough together, until smooth. Roll the dough between 2 pieces of parchment paper, just to about 10 inches in diameter.
Transfer rolled crust dough onto the tart and press it down, and up the sides. Use all the dough to line the pan.
Line the pan with a piece of parchment square and fill  it with  the pie beads, dry  rice or dry beans.

Bake at 350F for 12-15 minutes. 
Prepare Apples.(recipe below)
Remove from the oven and let cool slightly.
Layer prepared apples into the pre-baked crust.
Bake at 350F for 30-40 minutes.
Take the tart from the oven and let it cool for 20 minutes.                       
Prepare Thick Caramel Sauce(recipe below)

Remove the tart from the pan.
Brush the tart with prepared caramel. Let cool completely, serve.
 You can also prepare this day ahead. Let the tart come to room temperature before serving.

Filling
5 apples, peeled, cored and thinly sliced
1tsp cinnamon                     
juice of once lemon
2tbl brown sugar
Gently toss  sliced apples with brown sugar, lemon juice and cinnamon, set aside.

Thick Caramel Sauce
1/4cup sugar
2tbl water
2 1/2 tbl heavy cream
1tbl butter
1/4 tsp vanilla extract
pinch of salt
In a small sauce pan, stir together sugar and water. Bring to boil, stir until sugar melts.
Once sugar is melted, stop stirring.
Using a wet pastry brush, wash down the sides of the pan. This prevents forming of crystals on the pan. You may have to do this about 3 times while the caramel is cooking.
Boil caramel over high heat, but don't stir. Cook until  it reaches deep amber color. Be careful not to cover cook. This may take from 4-6 minutes.
 Remove from the heat and pour 2 1/2 tbl of heavy cream into the caramel. Caramel with sizzle and harden, continue stirring until caramel melts, add butter, vanilla and pinch of salt. Stir well, until smooth. Set aside.


Thursday, November 1, 2012

Give Thanks: Thankful Turkey Box


Hi There! I am so excited to be here at Whatever Dee-Dee Wants today and feel honored to be a part of her Give Thanks Series!!


My name is Rachel. I am a Wife and Mommy to three adorable kids and I blog over at I Heart Crafty Things. We are a family who loves children's books and all things crafty, so at my blog you will find hundreds of children's crafts coupled with corresponding books, and read about my ups and downs of Motherhood.

I am really excited to share with you the fun "Give Thanks" inspired idea we came up with to celebrate our blessings this year. We call it our Thankful Turkey Box.


It is made out of a small tissue box so every day during the month of November we can write down something we are thankful for and feed it to our turkey. On Thanksgiving day while we are all together as a family, we will get all the papers out and read them together as a family.


Making it is so simple. Start by painting an empty, small tissue box with brown acrylic paint.


For the feathers we painted card stock paper red, orange and yellow. Then we used the same paint to splatter the different paint colors on each sheet of paper. You can imagine how much fun this is for kids. Just make sure you do this step outside or cover your table with newspaper because it gets messy.


Here is up close of what our paper looked like after painting it. You could use just colored card stock for the feathers if you want, we just wanted to incorporate a fun painting activity into our craft.


After the paint is completely dry, cut out a bowling ball type of shape out of brown card stock for the turkey head and body and glue it to the tissue box.


I traced a feather shape on the back of the painted card stock papers and we cut out all of the feathers.


I glued them around the back of the tissue paper box and then used packaging tape to secure them at the back.


To finish the turkey, glue on some wiggly eyes, a nose made out of diamond shape bent in half, and a red wattle.
 

Place a stack of thankful cards next to your turkey, and every day or every couple of days you and your family members can write what you are thankful for and place it in the box.

 
Happy Thanksgiving!! I hope you will stop by I Heart Crafty Things to say hello and check out all of our fun kids crafts and projects!
rachel