Showing posts with label Give Thanks 2013. Show all posts
Showing posts with label Give Thanks 2013. Show all posts
Monday, November 25, 2013
Thursday, November 21, 2013
Give Thanks: Printable
Hi there! It's Lauralee from yellowmums today. I'm really grateful to be here at this giving thanks time of year. Seriously, Thanksgiving is one of my favorite holidays. I love that it's all about just being grateful! No toys to buy, no fussy stuff, just simple. Family, friends, FOOD and being glad you have all three.
Anyway, we all have so much to be grateful for, and I know when I focus on those things I am happier. So here's to happiness with what we've got: A thankful printable to remind us this time of year, and all year about choosing to be grateful for what we already have.
Get the 8x10 pdf free printable HERE. Print it on an 8 1/2 x 11 sheet of white cardstock. Cut down to 8x10 following the black outline and frame. Done. Simple. Fast. (And I am grateful for those kind of craft projects too!)
enjoy!
Wednesday, November 20, 2013
Give Thanks: Thanksgiving for Children
Here are a few past Give Thanks Series posts that I love for kids
1) Turkey treat bag
Tuesday, November 19, 2013
Give Thanks: Homemade Granola
Melanie from you are my fave
One of the redeeming qualities about the weather getting cooler is that my oven can be on all day, every day and I can bake a plenty. Since my husband found the best granola recipe ever, it's become a staple in our household and I feel the need to share it with the world. Because that's what I do with good food, shove it into your face until you agree with me that it's delicious.
- a cardboard candy box (you can find similar ones here, the window makes it fancy)
- ribbon
- embossing label maker
- scoop
Labels:
Fall,
Give Thanks 2013,
Give Thanks Event,
Guest Post,
How To,
Recipe,
tutorial,
Yummy
Monday, November 18, 2013
Give Thanks: Fall Sweet Treats
Here are a few sweet treats from past Give Thanks Series posts.
 1) Apple Pie Baked in Apples by See Vanessa Craft
2) Pumpkin Cake by Simple Simon and Co
3) Apple Caramel Tart by Haniela's
4) Monogram Pies by Confetti Sunshine
Friday, November 15, 2013
Give Thanks: Gratitude Journal
Hi everyone! This is Cambria from Live to be Inspired. Since November is the month that reminds us to give thanks and show more gratitude, today I thought I would show you how I finally was able to commit to keeping a gratitude journal.
Over the years I have unsuccessfully started many gratitude journals. I've tried typing them up on my computer, I've tried just a three-ring cheap notebook, I've tried a nice leather bound lined notebook, etc. I thought I had tried it all.
Then, one day this last summer I was at Target and I saw this really cute day planner. I loved the gold. I loved the design of it, and I loved the price point! (Under $20!)
Funny quirk about me though, I don't keep a day planner. Well, not a typical one. I keep all my "To Dos" running around in my head or on a calendar on my computer. So, I had to think quick for a reason as to why this super cute planner should make it in my shopping cart. Then it hit me, it would make an awesome gratitude journal. I started using it that night and now 4 months later, I can say that I have consistently kept gratitude journal for the first time ever! (And, yes. I consider 4 months consistent for this busy mom!)
I love the design of the journal/day planner and that it looks pretty sitting on my desk.
I love that the days are already there for me and that there is plenty of room in each box to write 3-5 things that I'm grateful for each night. That way I know what days I've missed and can go back (I'm not perfect!) and I can also look back and remember exactly what dates certain things happened.
I also really like that there is a month-at-a-glance section where I can write down birthday's, important events I am grateful for, etc.
...and I am a HUGE fan of the notes section. (As you can see, this is Decembers section. So no notes quite yet.) As part of my focus on being more grateful I have been trying to also spend more time each week reading favorite talks and articles, looking up quotes on gratitude, etc. Basically just trying to be more mindful of all that I have. Any quotes or important things that I want to remember, I jot down in the notes section of the journal. That way on days that I'm stuck or just not feeling very grateful I can look back at past gratitude lists or these notes. Always, without fail, once I get reading I am able to shift my mood around and get over my "woo is me" attitude. :)
So, there you have it. My gratitude journal in a nutshell. I think my favorite part about having everything written down is that I can go back and have a visual reminder of all that I have, which really is A LOT...even though I sometimes tend to forget that! For some reason, having it all written down and in one place seems to make it that much more real and memorable though.
How about all of you? How do you keep a gratitude journal?
Looking for motivation to get started with one? Try reading this awesome article about the importance of showing gratitude!
Thursday, November 14, 2013
Give Thanks: Fall Treat Box Printable
I love to give treats to friends and neighbors during the holidays. I also like to receive them, but who doesn't! I made these fun Happy Fall treat boxes that you can print, cut and glue yourself. I feel like Thanksgiving is overlooked in the treat department. I guess Christmas makes up for that, but this would be so fun to give to anyone like your kids teachers or your mail man. To download this printable, click here.
Wednesday, November 13, 2013
Give Thanks: Napkin Rings
Hi everyone! I am Elizabeth, one half of the duo of sisters'-in-law that blog at Simple Simon and Company. One thing that we love at Simple Simon are easy, simple projects that can be completed in an afternoon---and even better is one that you can do with kids!
This project is a kid-friendly one that fits all of that criteria and perfect for Thanksgiving....
Here is what you will need:
*felt feathers (I cut these out of felt scraps but you can find lots of feather silhouettes online if you want a template)
* brown felt for the napkin rings (each piece is 2 inches by 8 inches long)
* hook and loop tape
*fabric glue/hot glue
Step 1: Lay out your feathers on the band and glue into place (we used fabric glue).
Step 2: Glue hook and loop tape into place to form the napkin ring. I did go back and stitch these down to hold the glue into place.
Step 3: Place on your napkin and you are done!
These might even be great to make the morning of Thanksgiving so that you can keep little hands busy while adults are cooking! My kids had so much fun with these....
Thanks for having us here today!!!! And be sure to check out Simple Simon and Company for more Thanksgiving projects---like these printable props that liZ made!
Tuesday, November 12, 2013
Give Thanks: Pumpkin Waffles
My husband and I came up with our own recipe for pumpkin waffles a couple months ago and it has been our favorite thing to eat since. We combined the pumpkiny flavor of the waffles with a creamy and delicious cinnamon syrup. It tastes like fall would taste if you could take a big bite out of the air. That sounds weird. But you get what I'm saying! I love love love these waffles with this syrup!
(The syrup recipe comes from the fabulous Jamie from Jamie Cooks It Up! I've tried to make my own cinnamon syrup recipe, but I can't get over hers. It's SO good!)
Pumpkin Waffles
- 2 c. flour
- 1/2 c. brown sugar, packed
- 2 1/4 tsp. baking powder
- 1 1/2 tsp. cinnamon
- 1 tsp. salt
- 2 eggs
- 1 1/2 c. milk
- 3 Tbsp canola oil
- 1 c. canned pumpkin (not pumpkin pie mix)
Mix all of the dry ingredients together. I like to sift them all together then pour in what didn't sift of the brown sugar. In a separate bowl combine all the wet ingredients.
Pour the dry ingredients into the bowl with the wet ingredients and mix together. Spray the inside of the waffle iron on the top and the bottom and cook the waffles.
Cinnamon Syrup
- 1 c. sugar
- 1/2 c. corn syrup
- 1/4 c. water
- 1 tsp. cinnamon
- 1 tsp. vanilla extract
- 1/2 c. evaporated milk
Place sugar, corn syrup, water, and cinnamon in a saucepan and stir well to combine. Heat over medium-high heat and cook for about 4 minutes when it starts boiling, stirring constantly. Remove from heat and add vanilla extract and evaporated milk. Whisk together. Serve warm with these fabulous Pumpkin Waffles. (Store any leftovers in the fridge.)
Enjoy!
Monday, November 11, 2013
Give Thanks: Pumpkin Topiary
Hi friends of DeeDee!
We are twin sisters Kelli & Kristi of Lolly Jane and we are thrilled to be taking part in Dianna's fun Give Thanks series. We lovely love fall and decorate to the nine for it. Because it's still bloody hot in Arizona during the rest of the country's prettiest time of year (like, our leaves go from green to falling off, there's not much changing colors around here! lol) we decorate the INSIDE of our homes in fall decor... and maybe light some pumpkin scented candles to help urge the weather to cool down. ;) Today we're sharing an easy makeover to get you in the fall spirit, too, our liquid gilding pumpkin topiary:
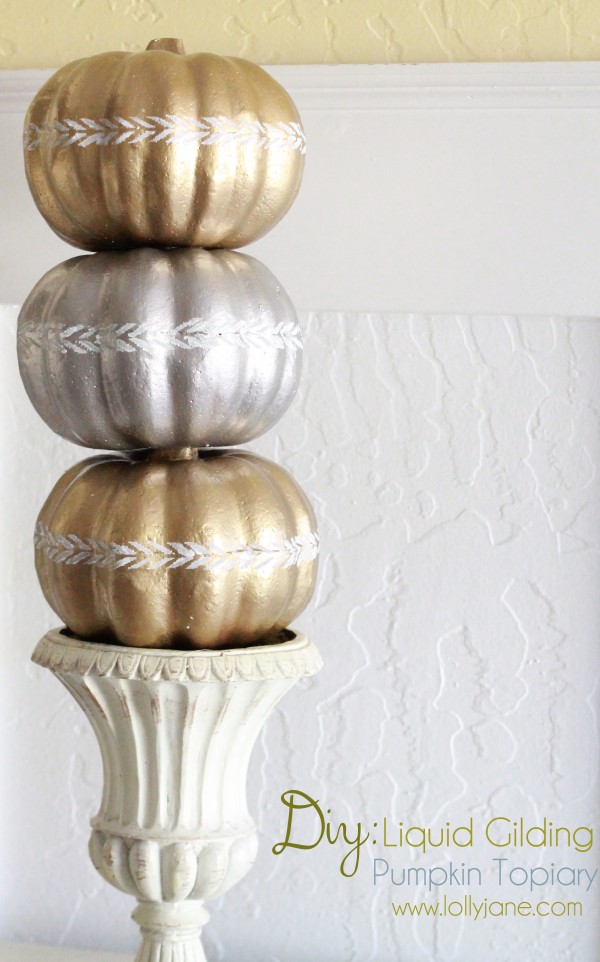 I love how they turned out and would you believe us if we told you that these pumpkins were purchased from the dollar store?! I know! These are so easy to make, you’ll be surprised at how little work is required.
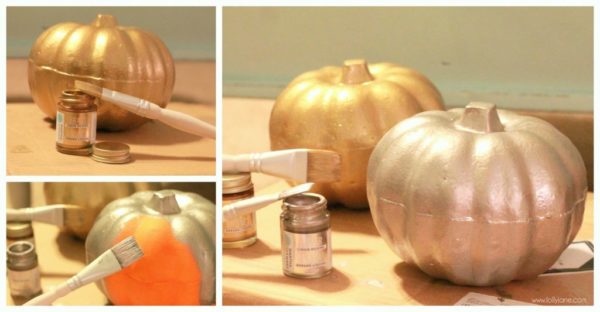
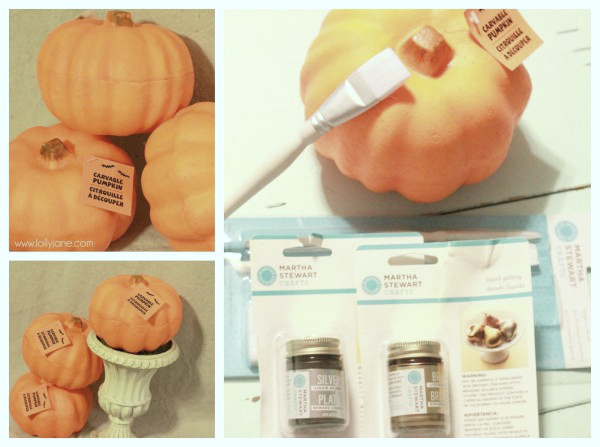 I bought 3 pumpkins at Dollar Tree since I knew I wanted to recycle the vase from my candy corn tree craft a couple years ago. I wanted to use both my silver and gold liquid gilding so I decided to alternate the colors for the pumpkin topiary and sandwich silver in the middle.
 These turned out so cute; they’re pretty enough on their own. However, I wanted to add one more layer to tie them together and match the vase so I dug through my Martha loot and found these cute adhesive stencils. Perfect! They stuck so well to the pumpkins (I did allow them to dry overnight, for the record) and they didn’t peel off any of the gilding at all.
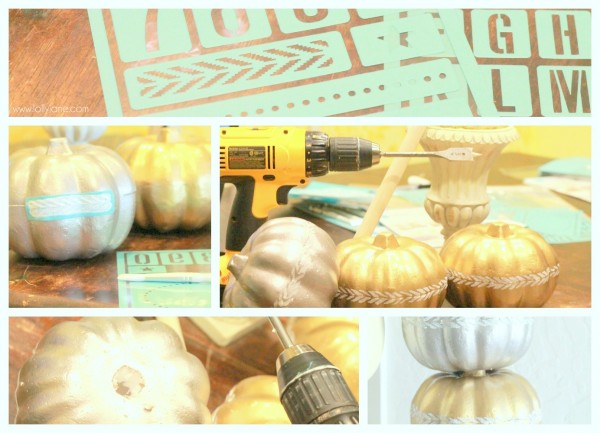 After the stencil was dry, I drilled a hole into the bottoms of the pumpkins and through 2 of them stems (one will be on top so don’t drill through all 3 completely!) then slid a dowel through them all ($.55 at Home Depot). Definitely beginner level project! Note: the gilding requires nail polish remover to clean the brushes and stains your hands so wear latex gloves to avoid a mess. I love the result for this quick and easy transformation and I especially love how clean and simple my fall display is:
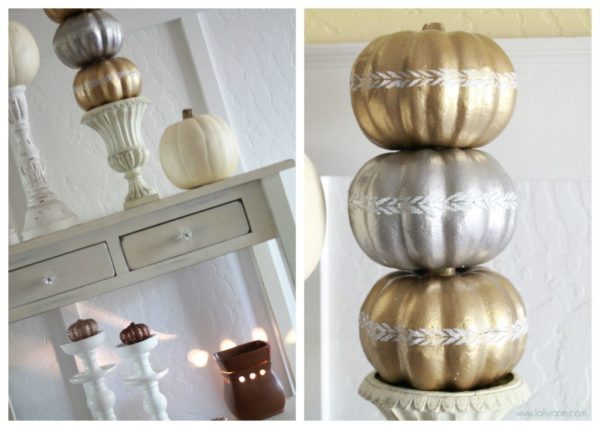 I have more to add but this table in my entryway is all about fall and looks so chic now. I just adore it!
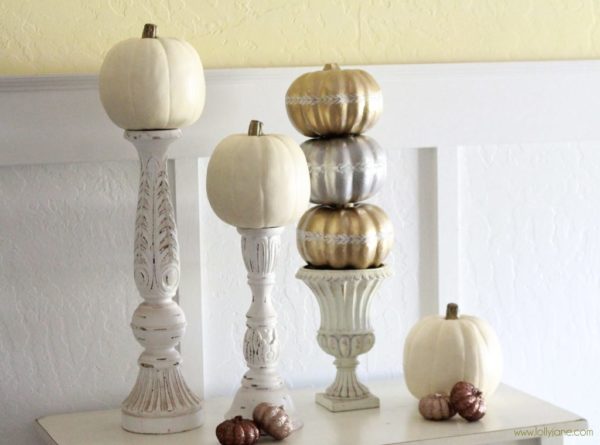 Can’t you just see this on your fall tablescape or fall mantel? I am pretty much wanting to put these all over my house (; And why not? So inexpensive! You could use these for your Halloween decor as well, depending what colors you decorate with.
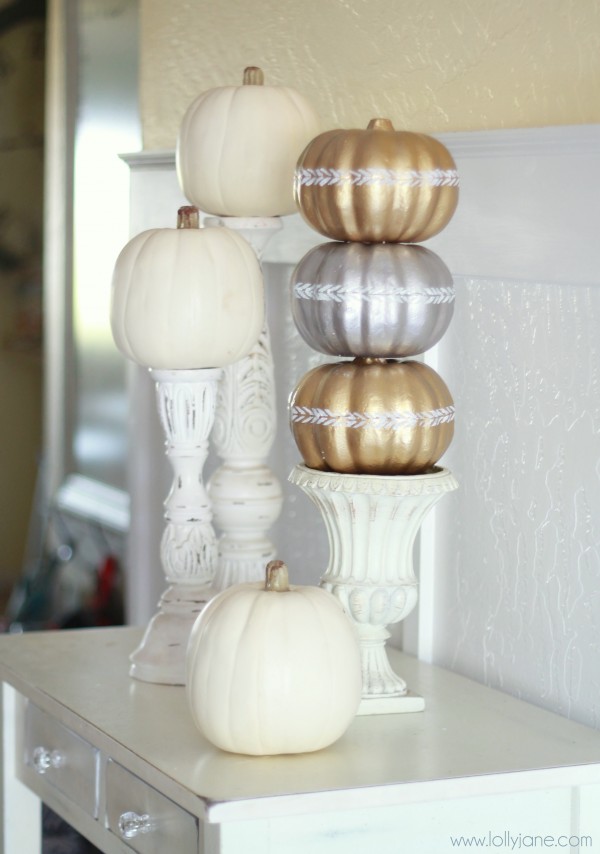 For more of our fall tutorials and to see the whole mantel display, mozy over to LJ. We'd love to chat with you on FB or Instagram or see what lovely fall projects you're pinning on Pinterest. :)
Thanks for having us, Dianna! xo

 I love how they turned out and would you believe us if we told you that these pumpkins were purchased from the dollar store?! I know! These are so easy to make, you’ll be surprised at how little work is required.
 I bought 3 pumpkins at Dollar Tree since I knew I wanted to recycle the vase from my candy corn tree craft a couple years ago. I wanted to use both my silver and gold liquid gilding so I decided to alternate the colors for the pumpkin topiary and sandwich silver in the middle.
 These turned out so cute; they’re pretty enough on their own. However, I wanted to add one more layer to tie them together and match the vase so I dug through my Martha loot and found these cute adhesive stencils. Perfect! They stuck so well to the pumpkins (I did allow them to dry overnight, for the record) and they didn’t peel off any of the gilding at all.
 After the stencil was dry, I drilled a hole into the bottoms of the pumpkins and through 2 of them stems (one will be on top so don’t drill through all 3 completely!) then slid a dowel through them all ($.55 at Home Depot). Definitely beginner level project! Note: the gilding requires nail polish remover to clean the brushes and stains your hands so wear latex gloves to avoid a mess. I love the result for this quick and easy transformation and I especially love how clean and simple my fall display is:
 I have more to add but this table in my entryway is all about fall and looks so chic now. I just adore it!
 Can’t you just see this on your fall tablescape or fall mantel? I am pretty much wanting to put these all over my house (; And why not? So inexpensive! You could use these for your Halloween decor as well, depending what colors you decorate with.
 For more of our fall tutorials and to see the whole mantel display, mozy over to LJ. We'd love to chat with you on FB or Instagram or see what lovely fall projects you're pinning on Pinterest. :)
Thanks for having us, Dianna! xo

Wednesday, November 6, 2013
Give Thanks: Apple Walnut Phyllo Tart
My name is Hani, I write a blog Haniela's and today I wanted share with you a really easy dessert - Apple Walnut Phyllo Tart. It is delicious and I hope you'll try it out.
I also prepared a video recipe tutorial for you, so you can check it out below.
Happy Fall and Thanksgiving everyone.
Apple Walnut Phyllo Tart
1/2cup (60grams) toasted walnuts
1/3cup(30grams) old fashioned oat
1/4cup packed (55grams) brown sugar
1/2tsp Saigon Cinnamon
2tbl chopped candied ginger, or crystallized ginger
6-8 phyllo sheets
cooking spray or 2tbl vegetable oil mixed with 2tbl melted butter
2 to 3 medium apples, peeled sliced into thin slices
- Preheat oven to 350F. Spread walnuts on a baking sheet, toast for 10 minutes.
- Remove walnuts from the oven, let cool to room temperature. Increase oven temperature to 375F(190C).
- Process walnuts, oats, cinnamon, brown sugar and candied ginger in the food processor, pulse for up to a minute, leaving tiny pieces of oats and walnuts. Set aside
- Line a baking sheet with parchment paper.
- Unroll phyllo sheets, cover with damp paper towel to prevent drying out.
- Start layering phyllo sheets onto the baking sheet, spray each sheet with cooking spray.
- Sprinkle walnut filling on top of each layer, layer 6 to 8 phyllo sheets.
- On last sheet sprinkle some filling and layer sliced apples on the top. Sprinkle remaining filling on top.
- Bake at 375F(190C) for 12 minutes, lower oven temperature to 340F and bake for additional 15 minutes or until apples are soft and edges are golden brown.
- Remove from the oven, let cool slightly, slice. Enjoy.
Tuesday, November 5, 2013
Give Thanks: Gratitude Journal
Sabra from Sew a Straight Line
Hello! I’m Sabra from Sew a Straight Line and I’m so happy to be here on Whatever Dee Dee Wants for her awesome Give Thanks series again. I love the whole concept of celebrating gratitude, and think Dianna is wonderful with all the work she puts into curating a month’s worth of thankful inspiration. For my Give Thanks contribution, I made a special family gratitude journal.

It’s a super simple project, but the thoughts and memories that you’ll record inside are what makes it extra special. My plan for the journal I made is to keep it with our Thanksgiving decorations, and pull it out every year. I’ll have each member of our family record a few thoughts on what they’re thankful for that year. In a few years, we’ll have a precious keepsake with all that gratitude all recorded and preserved in one spot.

To make one, you’ll need:
-blank notebook (I used an inexpensive composition book)
-Fat quarter of fabric
-Tacky glue (not pictured)
-Fabric adhesive (or you can use glue, but this works faster-no drying)
-Fold-over elastic 1/2 inch shorter than the height of the notebook
-Cardstock (not pictured)

Use the notebook to cut out fabric enough to cover front and back with at least an inch overhanging on all sides.

Either using glue or the fabric adhesive, attach the elastic at either end to the fabric.

Use the notebook as a guide. You want the elastic to come about 1- 1.5 inches in from the edge of the notebook.

Now, glue the fabric to the notebook


You’ll need to clip in at the top and bottom where the notebook’s spine is.

Fold the overhanging fabric into the front cover and glue in place.


Cut cardstock to match the covers of the notebook, minus .5 inch on all sides

Glue to the inside front and back covers, covering up the raw edges of the fabric.


Decorate the inside or outside covers and start recording.

Super simple. Like I said, my plan is to have each member of my family record a quick thought on what they are grateful for each year. Also, you could record family events that may have occurred over the year, milestones, etc. Or just use it as your own personal gratitude journal.

Thanks for letting me join in with Give Thanks, Dianna!

Subscribe to:
Posts (Atom)


